Introduction to Godot
This chapter introduces the fundamental concepts that will be used throughout the rest of this book. Before building complete games, it is important to become familiar with the Godot engine, its development environment, and the core programming concepts that drive gameplay.
In this chapter, you learned how to install Godot, create projects, navigate the editor, and work with scenes and nodes. These concepts form the foundation of every Godot game, regardless of its size or complexity. You also learned how to import assets, create sprites, and organise project resources effectively.
In addition, this chapter introduced GDScript, Godot’s built-in programming language. Through a series of practical examples, you explored variables, data types, functions, conditional statements, player input, and signals. These programming concepts will be used extensively throughout the projects in this book to control player movement, manage scores, detect collisions, create enemies, and implement game logic.
This chapter also provided an overview of the structure of the book and the types of games you will create. Throughout the following chapters, you will apply these concepts while developing four complete arcade-style games: a Space Shooter, a Breakout game, a Pacman-style game, and a Platformer. Each project has been carefully designed to introduce new game development techniques while reinforcing the skills learned in previous chapters.
By the end of this chapter, you should have a solid understanding of the Godot editor, the scene and node system, and the basic programming skills needed to begin creating interactive games.
After completing this chapter, you should be able to:
Understand the purpose and advantages of the Godot game engine.
Download, install, and launch Godot successfully.
Create and manage Godot projects.
Navigate the main areas of the Godot editor.
Explain the role of scenes and nodes in game development.
Create, save, and organise scenes within a project.
Import assets and display sprites in a scene.
Create and attach GDScript files to nodes.
Use variables and common data types in GDScript.
Create and call functions.
Use conditional statements to make decisions in code.
Handle player input using Godot’s input system.
Connect and use signals to respond to events.
Apply the concepts learned in this chapter to begin developing complete 2D games.
Introduction
Welcome to The Ultimate Guide to 2D Game Development with Godot.
In this book, you will learn how to create complete 2D games using the Godot game engine and its built-in scripting language, GDScript. Rather than focusing on theory alone, you will learn through practice by building four classic arcade-style games from start to finish: a Space Shooter, a Breakout game, a Pacman-style game, and a Platformer.
Game development is a rewarding activity that combines creativity, logic, problem solving, and programming. Whether you want to create games as a hobby, improve your programming skills, or take your first steps toward becoming a professional game developer, the skills you will learn in this book will provide a solid foundation.
One of the greatest strengths of Godot is its accessibility. The engine is free, lightweight, and easy to install, making it an excellent choice for beginners. At the same time, it contains many powerful features used by experienced developers to create commercial games. This combination of simplicity and power has helped Godot become one of the most popular game engines available today.
Throughout the chapters ahead, you will learn how to work with scenes, nodes, sprites, collisions, animations, user interfaces, audio, and game logic. You will also gain experience writing GDScript code to control player movement, create enemies, manage scores, handle collisions, and much more.
No prior experience with Godot is required. If you are completely new to the engine, don’t worry. Each concept will be introduced step by step, and every game project will build upon the skills learned in previous chapters. By the end of the book, you will not only have created four complete games, but you will also understand the core principles behind how they work.
Before we begin creating our first project, it is important to understand what Godot is, why it has become so popular among game developers, and what makes it an excellent choice for 2D game development. In the next section, we will explore the Godot engine and its key features.
What Is Godot?
What Is Godot?
In the previous section, we introduced the goals of this book and the exciting projects that you will create. Before we begin building games, it is worth taking some time to understand the tool that will make all of this possible: the Godot game engine.
Godot is a free and open-source game engine used to create both 2D and 3D games. It provides developers with a complete set of tools for designing levels, creating graphics and animations, writing code, managing audio, handling physics, and exporting games to multiple platforms.
Unlike many commercial game engines, Godot can be downloaded and used completely free of charge. There are no subscription fees, licensing costs, or royalties to pay when publishing your games. This makes it an attractive option for students, hobbyists, independent developers, and professional studios alike.
One of Godot’s biggest strengths is its excellent support for 2D game development. While many game engines focus primarily on 3D games, Godot includes a dedicated 2D workflow that makes it easy to create platformers, puzzle games, shooters, arcade games, role-playing games, and many other genres.
Godot uses a unique scene and node system to organize game objects. Every element in a game, whether it is a player, enemy, camera, sound effect, or user interface component, is represented by a node. Nodes can be combined to create scenes, which act as reusable building blocks for your game. This approach makes projects easier to organize and maintain, especially as they become larger and more complex.
Another major advantage of Godot is its scripting language, GDScript. GDScript was designed specifically for game development and is easy to learn, especially for beginners. Its syntax is clean and readable, allowing developers to focus on creating game mechanics rather than struggling with complicated code. Throughout this book, we will use GDScript to control player movement, create enemies, handle collisions, manage scores, and implement many other gameplay features.
Godot also supports exporting games to a wide variety of platforms. Once a game has been completed, it can be deployed to Windows, macOS, Linux, Android, iOS, and the web. This flexibility allows developers to reach players on many different devices without having to rewrite their projects from scratch.
Over the last few years, Godot has grown rapidly in popularity. Thousands of developers around the world now use it to create games ranging from small hobby projects to commercial releases. An active community, extensive documentation, and a growing collection of tutorials make it easier than ever to learn and master the engine.
In this book, we will focus specifically on Godot’s powerful 2D capabilities. However, before we can start building our games, we first need to install the engine on our computer. In the next section, we will download and install Godot and prepare our development environment.
Downloading and Installing Godot
Open the following link: https://godotengine.org/download/.
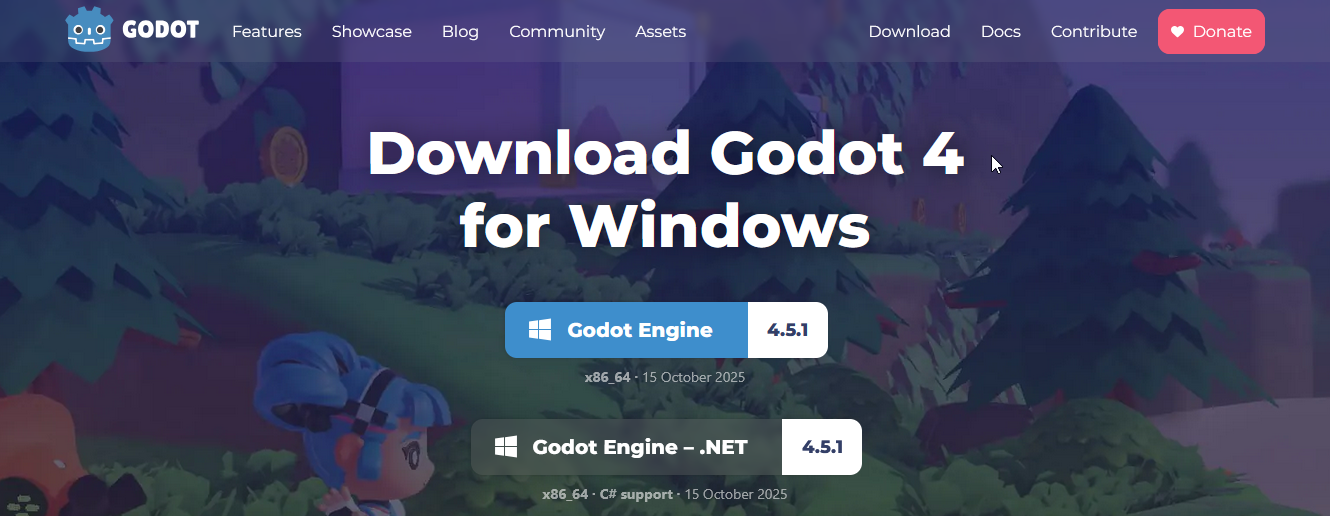
A new page will automatically load depending on your operating system; for example, if you are using Mac OS, the page https://godotengine.org/download/osx will open, and if you are using Windows, the page https://godotengine.org/download/windows will open instead.
Check the requirements for installing Godot on your computer listed on that page.
Once you have checked the requirements, we can start to download Godot: you will have the choice to download the Standard Version or the Mono Version (C# support). Because we will be using GDScript in this book series, click on the link for the Standard Version.
After clicking on the button for the Standard Version of Godot, the download should start, and the application should be downloaded to your computer.
After a few seconds, depending on your connection speed, a zip file containing the application should have been downloaded.
You can then unzip this file and run Godot by double clicking on the file that has just been unzipped.
Launching Godot and Creating Your First Project
After launching Godot, a new window will be displayed as follows.
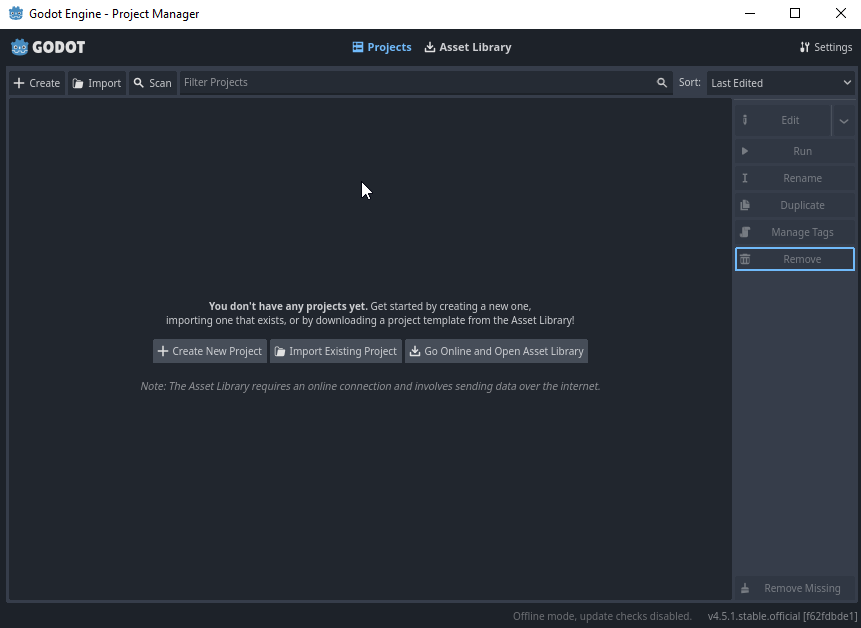
For now, we will create a new project to become familiar with the interface.
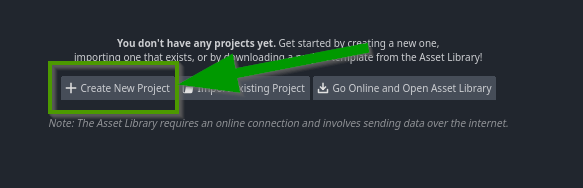
Click on the button labelled Create New Project.
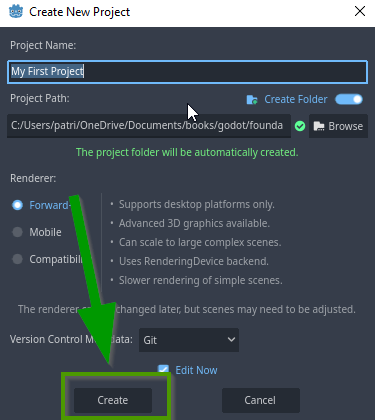
A new window will appear as illustrated in the next figure:
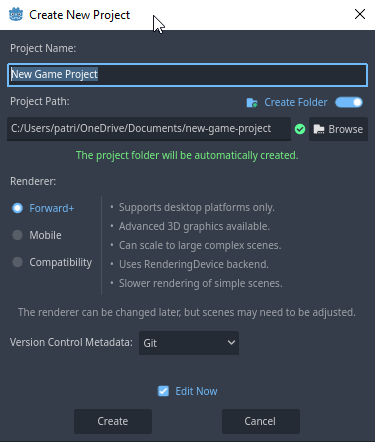
As we will see in the next steps, this window will make it possible for you to provide a name and a location for your project.
Enter a name for your project in the field labelled “Project Name”, for example “My First Project”.
By default, your project will be saved in your home folder; this being said, if you prefer to save it in a different location, click on the button labelled “Browse” to select the location of your choice and or create a new folder.
Type the name of the new folder and click on the button labelled “OK”.
Once this is done, you can click on the button labelled “Select Current Folder” so that the folder that you have just created is used for your project.
In the new window, you can then click on the button labelled “Create”.
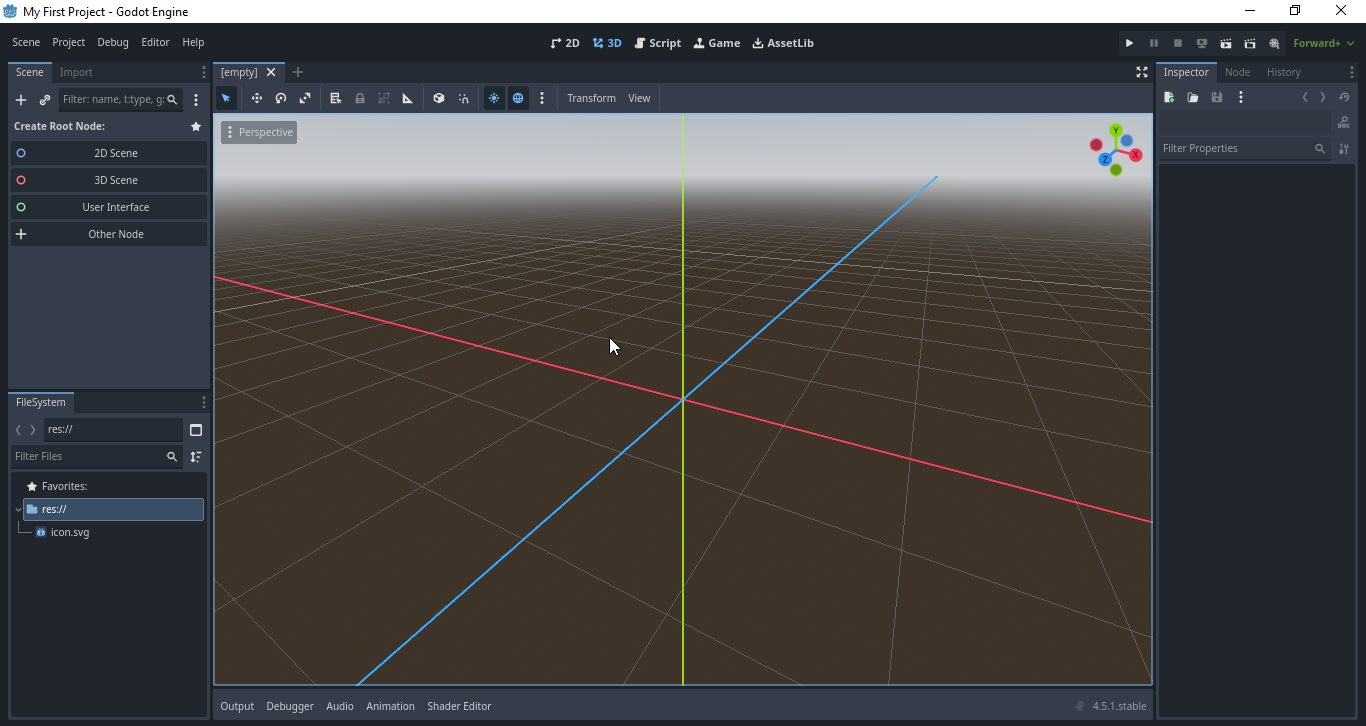
At this stage Godot should open.
That’s it, you have now installed and launched Godot. In the next section, we will start to familiarize ourselves with the different windows available in Godot.
Godot provides links to official forums and documentation from the main (i.e., top) menu: Help | Online Documentation
Congratulations! You have just created your first Godot project.
At this point, the project is empty. No scenes, scripts, or game objects have been created yet. However, the project already contains an important structure that Godot will use to organize your files as development progresses.
As you create games, your project folder will gradually contain:
Scenes
Scripts
Images and sprites
Audio files
Fonts
Animations
User interface elements
Keeping these resources organized is an important habit that will save time and prevent confusion as projects become larger.
Before we begin creating game objects and writing code, it is important to become familiar with the Godot editor itself. In the next section, we will take a guided tour of the interface and examine the tools that you will use throughout this book.
Exploring the Interface
Godot includes several windows organized in a (default) layout. Each of these windows includes a label in their top-left corner. These windows can be moved around and rearranged, if necessary, by either changing the layout (using the menu Editor | Editor Layout | …) or by dragging and dropping the corresponding tab for a window to a different location. This will move the view/panel (or window) to where you would like it to appear on screen. In the default layout, the following views appear on screen.
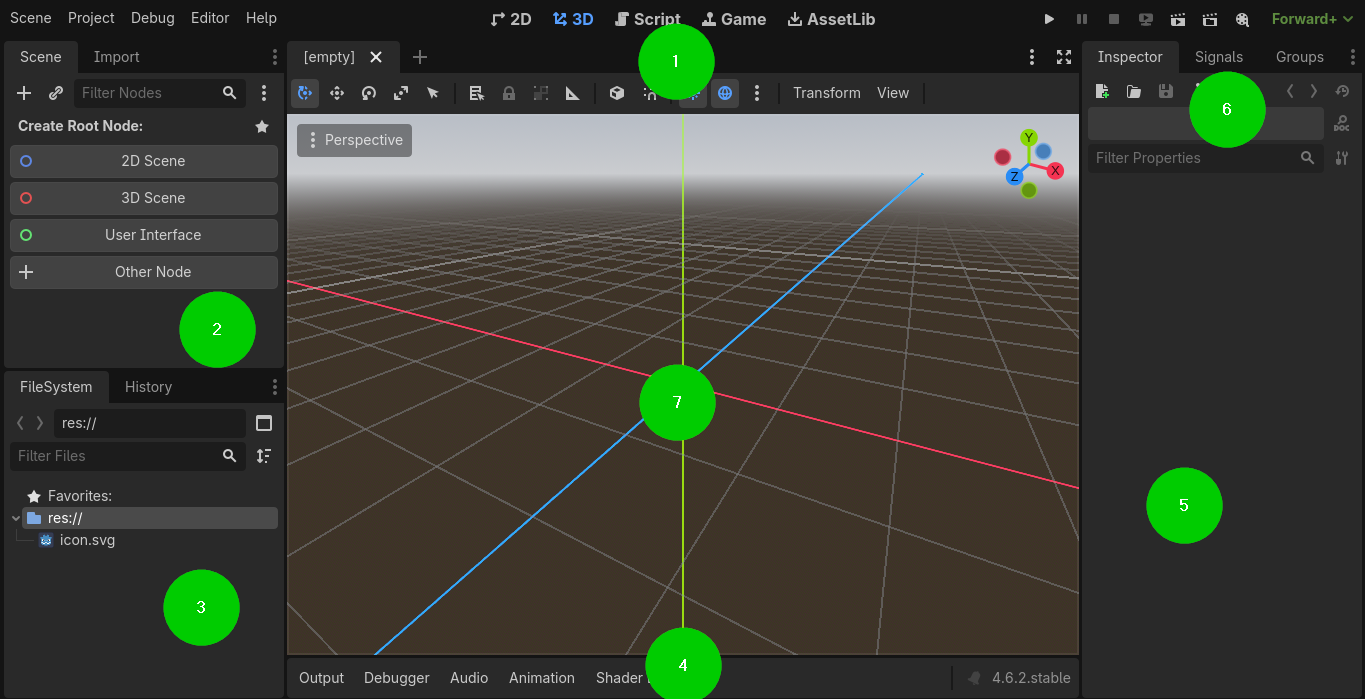
The top tabs: these workspaces are used to visualize a 3D scene, or a 2D scene, the scripts included in your scene, and the different assets that you can avail of for your project.

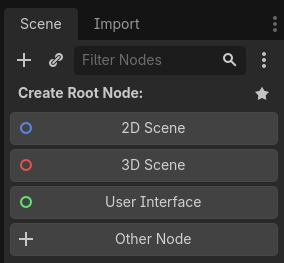
The Scene tab: this window or view lists all the nodes currently present in your scene. These could include, for example, basic shapes, 3D characters, or terrains. This view also makes it possible to identify a hierarchy between nodes, and to identify, for example, whether an object has children or parents (we will explore this concept later).
The FileSystem tab: this window or tab includes all the assets available and used for your project, such as 3D models, sounds, or textures.
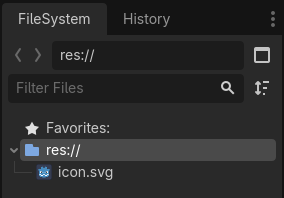
The bottom tabs: these tabs include information related to your actions in Godot, as well as compile errors, amongst other things. More specifically information will be related to animation, audio, compilation, messages from your code, and actions in Godot.

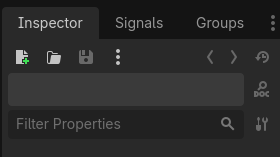
The Inspector tab: this tab displays information (i.e., the properties) on the asset or the node that is currently selected.
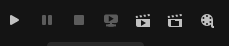
The Play-Test buttons (located in the top right corner): these buttons make it possible to play/pause/stop/build the current project or scene.
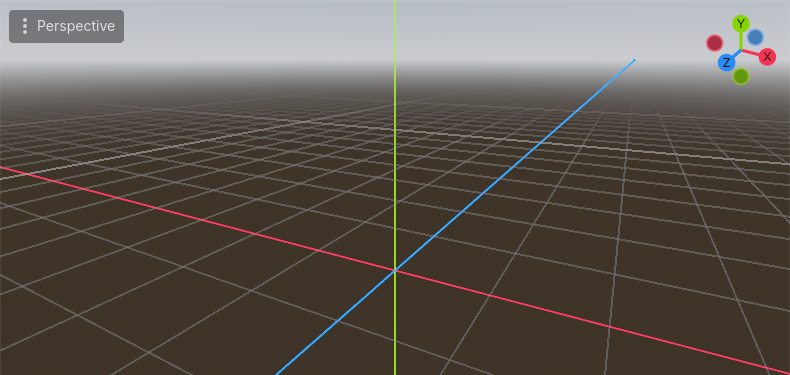
The Viewport: this tab located in the middle of the screen displays the content of a scene (or the item listed in the Hierarchy view) so that you can visualize and modify them accordingly (e.g., move, scale, etc.).
Understanding Scenes and Nodes
In the previous section, we explored the Godot interface and became familiar with the tools available in the editor. Before we begin creating game objects, it is important to understand two of the most fundamental concepts in Godot: nodes and scenes.
Almost everything you create in Godot is built using nodes. A node is a building block that performs a specific function within a game. Some nodes display graphics, others play sounds, detect collisions, handle user input, or control cameras.
You can think of nodes as individual components that work together to create a complete game.
For example, a simple player character might contain several nodes:
A node to represent the player itself
A sprite node to display the player’s image
A collision node to detect obstacles
An animation node to play animations
An audio node to play sound effects
Each node has a specific responsibility, making projects easier to organize and maintain.
The Scene Tree
Nodes are organized in a hierarchical structure known as the Scene Tree.
The Scene Tree appears on the left side of the editor and shows the parent-child relationships between nodes.
For example, a player scene might look like this:
Player
Sprite2D
CollisionShape2D
AudioStreamPlayer2D
In this example, the Player node is the parent node, while the other nodes are its children.
Child nodes inherit transformations from their parent. If the player moves, rotates, or scales, its child nodes move, rotate, or scale along with it.
This parent-child structure allows developers to create complex game objects from smaller, reusable components.
Common Node Types
Godot provides many different node types, each designed for a specific purpose.
Some of the most commonly used nodes in 2D games include:
Node2D: A basic 2D node used as a parent for many game objects.
Sprite2D: Displays an image.
CharacterBody2D: Used for player characters and moving objects.
StaticBody2D: Used for walls and other stationary objects.
Area2D: Detects overlaps and trigger events.
CollisionShape2D: Defines a collision area.
Camera2D: Controls the player’s view of the game world.
Label: Displays text on the screen.
AnimatedSprite2D: Plays sprite-based animations.
As you progress through this book, you will become familiar with many of these nodes and learn when to use them.
What Is a Scene?
A scene is a collection of nodes that work together to create a specific object or part of a game.
For example, a player can be stored as a scene. An enemy can be stored as a scene. A level can be stored as a scene. Even a menu screen can be stored as a scene.
Scenes allow developers to create reusable building blocks that can be instanced throughout a project.
For example, imagine creating a ghost enemy for a Pacman-style game. Instead of creating each ghost from scratch, you can create a single Ghost scene and then instantiate it multiple times in your game.
This saves development time and makes future changes much easier. If you modify the original scene, all instances automatically benefit from the update.
Scenes Within Scenes
One of Godot’s most powerful features is that scenes can contain other scenes.
For example:
A Main scene may contain a Player scene.
A Main scene may contain several Enemy scenes.
A Main scene may contain a User Interface scene.
This approach allows large projects to be divided into smaller, manageable pieces.
As games become more complex, this modular structure becomes extremely valuable.
Why Scenes and Nodes Matter
The scene and node system is one of the reasons why many developers enjoy working with Godot.
Instead of creating large monolithic objects, developers build games using small, focused components that can be reused and combined in different ways.
Once you understand scenes and nodes, many aspects of Godot become much easier to understand.
In the projects that follow, every game object we create, including players, enemies, bullets, collectibles, walls, cameras, and user interfaces, will be built using scenes and nodes.
Now that we understand the basic structure used by Godot, it is time to create our first scene and begin building our own game objects. In the next section, we will create a simple scene and learn how to save and manage it within our project.
Creating Your First Scene
Now that you understand how nodes and scenes work, it is time to create your first scene. As we learned in the previous section, scenes are one of the fundamental building blocks of a Godot project. Every player character, enemy, menu, level, and user interface element can be created as a scene.
In this section, we will create a simple scene and learn how to save it within our project.
Creating a New Scene
To create a new scene, locate the Scene dock in the upper-left corner of the editor.
Click the + button or select Scene | New Scene from the menu.
Godot will ask you to choose a root node for the scene. The root node acts as the top-level node that contains all other nodes within the scene.
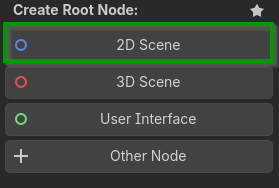
For this example, select 2D Scene.
A new scene will be created with a single Node2D node appearing in the Scene Tree.
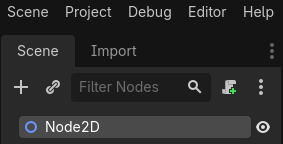
At the moment, the scene does not contain any visible objects, but it provides the foundation upon which we will build.
Renaming the Root Node
By default, the root node is named Node2D.
It is good practice to rename nodes so that their purpose is clear.
To rename the node:
Select the Node2D node in the Scene Tree.
Press F2 or right-click and select Rename.
Enter the name Main.
Your Scene Tree should now contain a root node named Main.
Using meaningful names makes projects easier to understand and maintain, especially as they grow larger.
Saving the Scene
Before adding additional nodes, it is a good idea to save the scene.
Click Scene | Save Scene or press Ctrl + S.
Godot will ask you to choose a location and filename.
Create a folder called Scenes if one does not already exist.
Save the scene as: main.tscn
The .tscn extension stands for Text Scene, which is Godot’s standard scene file format.
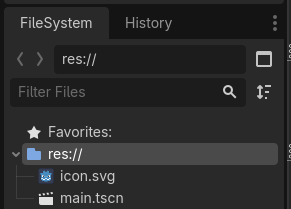
After saving, the scene will appear in the FileSystem dock.
Understanding the Root Node
Every scene requires a root node.
The root node serves as the parent of all other nodes within the scene.
As we add objects to our games, they will become children of the root node or one of its descendants.
For example, a simple game scene might eventually contain:
Main
Player
Enemy
Camera2D
CanvasLayer
ScoreLabel
This hierarchical structure helps keep projects organized and easy to navigate.
Opening and Closing Scenes
As projects become larger, you will often work with multiple scenes.
Godot allows you to open, edit, and switch between scenes easily using the tabs located above the editor viewport.
You can also double-click a scene in the FileSystem dock to open it.
This flexibility makes it possible to work on individual game objects separately before combining them into larger projects.
Running a Scene
One of the most useful features of Godot is the ability to run a scene independently.
To run the current scene, click the Run Current Scene button located in the upper-right corner of the editor, or press F6.

Since our scene is currently empty, a blank window will appear.
Although this may not seem exciting yet, it confirms that the scene has been created correctly and can be executed by the engine.
As we continue adding nodes, images, and scripts, the contents of this window will gradually become our game.
Organizing Your Project
Even in small projects, organization is important.
A common structure is to create separate folders for different types of resources:
Scenes
Scripts
Sprites
Audio
Fonts
Developing good organizational habits early will make your projects easier to manage as they become more complex.
We now have a working scene saved within our project. However, the scene is still empty and contains no visible objects. In the next section, we will learn how to import images and assets into Godot and use them to create visible game elements.
Adding Sprites and Assets
In the previous section, we created and saved our first scene. While the scene is functional, it does not yet contain any visible objects. To create interesting games, we need to add images, sounds, fonts, and other resources, collectively known as assets.
In this section, we will learn how to import assets into Godot and display an image using a Sprite2D node.
What Are Assets?
Assets are the resources used to build a game. They provide the visual and audio elements that players interact with.
Common asset types include:
Sprites and textures
Sound effects
Music
Fonts
Animations
User interface graphics
Throughout this book, we will use various assets to create our games, including player characters, enemies, backgrounds, sound effects, and user interface elements.
Importing Assets into a Project
Importing assets into Godot is straightforward.
Locate the FileSystem dock at the bottom of the editor. This panel displays all files and folders associated with your project.
To import assets, simply drag and drop files from your operating system into the FileSystem dock.
For example, you might create a folder called Sprites and drag a PNG image into it, including one from the resource pack provided for this book.
Once the file has been copied into the project folder, Godot automatically imports it and makes it available for use.
You should now see the image listed in the FileSystem dock.
Creating a Sprite2D Node
To display an image on the screen, we use a Sprite2D node.
Select the Main node in the Scene Tree.
Click the Add Child Node button and search for Sprite2D.
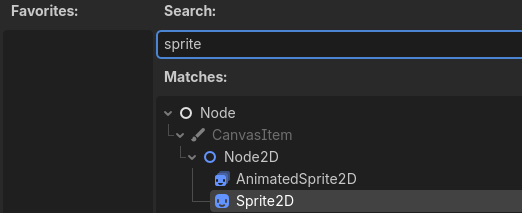
Select the node and click Create.
A Sprite2D node will appear as a child of the Main node.
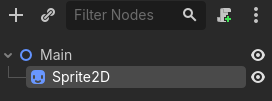
At this stage, nothing will be visible because the sprite does not yet have an image assigned to it.
Assigning an Image to a Sprite
Select the Sprite2D node.
In the Inspector panel, locate the Texture property.
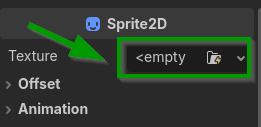
Click the empty field and select the image you imported earlier or just drag and drop the godot image, called icon.svg, available in the File System.
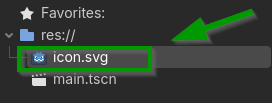
Alternatively, you can drag the image directly from the FileSystem dock onto the Texture property.
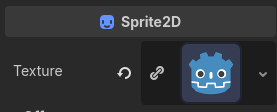
As soon as the image is assigned, it will appear in the editor viewport.
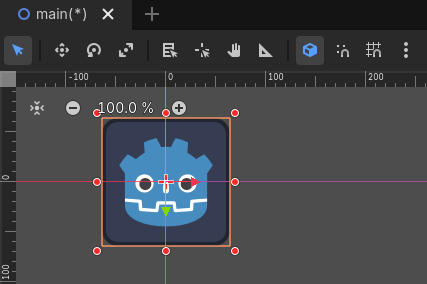
You have successfully displayed your first sprite.
Positioning the Sprite
The sprite can be moved using the Move Tool.
Select the Sprite2D node and drag it to a different location in the viewport.
You can also modify its position numerically using the Transform section of the Inspector.
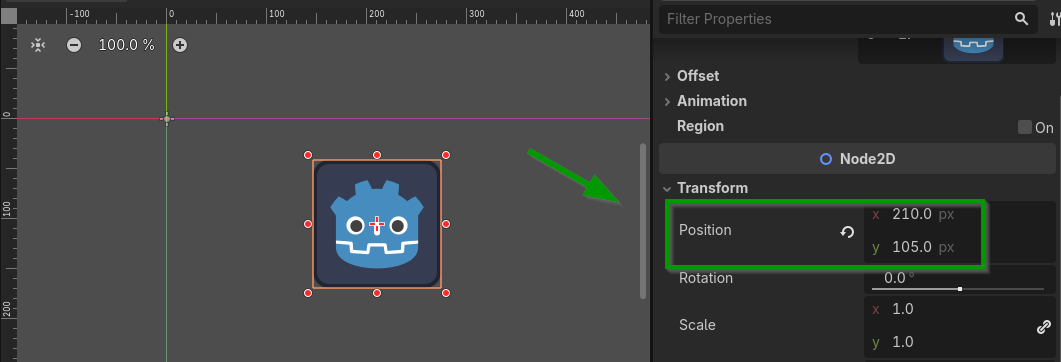
The Position property contains X and Y coordinates that determine where the sprite appears on the screen.
Scaling and Rotating Sprites
In addition to moving sprites, Godot allows you to resize and rotate them.
The Scale property controls the size of the sprite.
For example:
A scale of (1,1) displays the sprite at its original size.
A scale of (2,2) doubles its size.
A scale of (0.5,0.5) reduces it by half.
The Rotation property allows you to rotate the sprite around its centre.
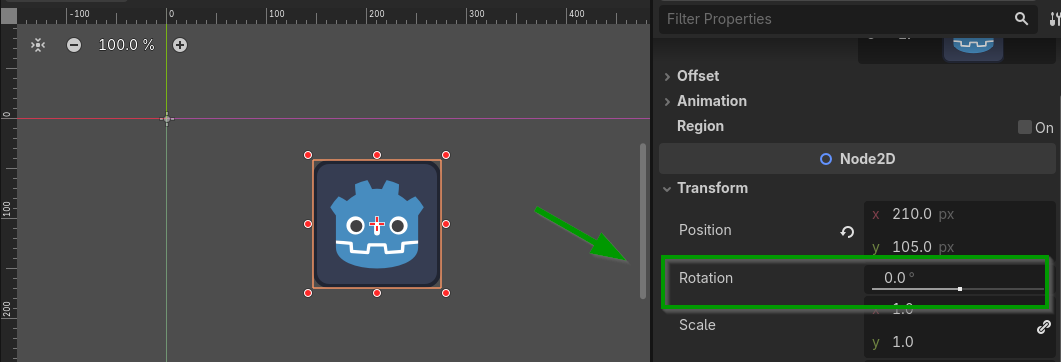
These properties are useful when creating game objects with different appearances and behaviours.
Testing the Scene
Save the scene and press F6 to run it.
A window should appear displaying your sprite.
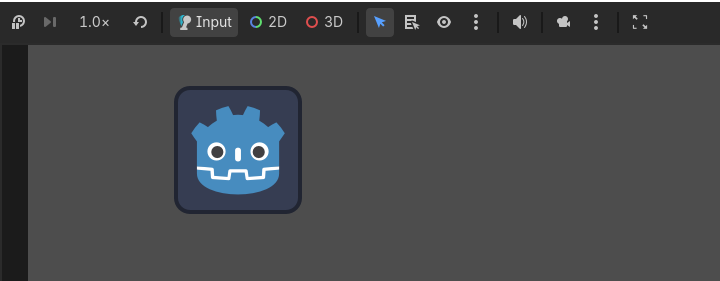
Although this is a simple example, it demonstrates an important concept: every visual object in our games will ultimately be represented by nodes displaying assets.
Organizing Project Assets
As projects grow, it is important to organize assets into folders.
A common folder structure might look like this:
Assets
Sprites
Audio
Fonts
Backgrounds
Maintaining an organized project structure makes it easier to locate resources and reduces confusion when working with larger projects.
You now know how to import assets and display sprites within a scene. However, our game objects are still static and cannot perform any actions. In the next section, we will introduce GDScript, Godot’s built-in programming language, and begin writing code to control our game objects.
Introduction to GDScript
Now that we know how to create scenes and display assets, it is time to make our game objects come to life. To do this, we need a way to control their behaviour, respond to player input, and implement game logic. In Godot, this is achieved using GDScript.
GDScript is Godot’s built-in programming language. It was specifically designed for game development and integrates seamlessly with the engine. Its syntax is simple, readable, and easy to learn, making it an excellent choice for beginners while still being powerful enough for professional game development.
If you have previous experience with Python, you may notice that GDScript looks very similar. However, GDScript was designed specifically for Godot and includes many features that make it easy to interact with nodes, scenes, animations, physics, and other game-related systems.
Why Use GDScript?
GDScript offers several advantages for Godot developers.
It is:
Easy to learn
Fast to write
Closely integrated with the Godot editor
Designed specifically for game development
Supported by extensive documentation and community resources
Because GDScript is built directly into Godot, it allows developers to access engine features quickly and efficiently without requiring additional tools or software.
What Can GDScript Do?
GDScript can be used to control virtually every aspect of a game.
For example, it can:
Move characters
Detect collisions
Play sounds
Manage scores and lives
Spawn enemies
Handle user input
Create animations
Control game states
Throughout this book, we will use GDScript extensively to implement the gameplay mechanics found in our various projects.
Creating Your First Script
Scripts are attached directly to nodes.
To create a script:
Select the Main node in the Scene Tree.
Click the Attach Script button at the top of the Scene dock.
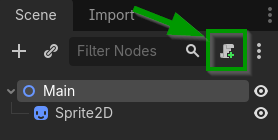
Accept the default settings.
Click Create.
Godot will automatically create a new script and open it in the Script Editor.
You should see something similar to the following:
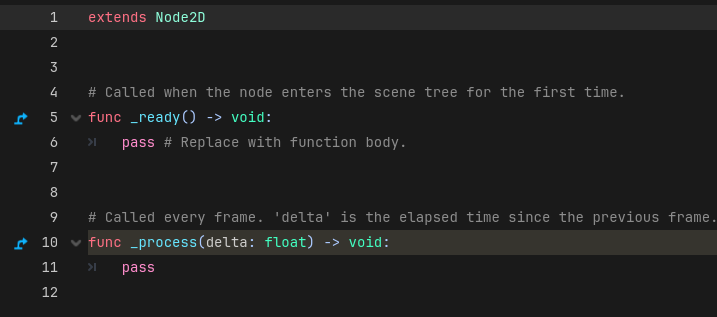
Do not worry if this code looks unfamiliar. We will examine each part in detail.
Understanding the Script Structure
The first line tells Godot which type of node the script is attached to.
extends Node2DIn this example, the script extends a Node2D node.
This means the script can access all the properties and functionality provided by Node2D.
The next section contains a function:
func _ready():
    pass
The _ready() function is called automatically when the node enters the scene.
The word pass simply means “do nothing.”
Later, we will replace pass with our own code.
Writing Your First Line of Code
Let’s make the script display a message.
Replace the existing code with:
func _ready():
    print("Hello Godot!")
Save the script and run the scene.
When the game starts, the message will appear in the Output panel at the bottom of the editor.
Although this example is simple, it demonstrates an important concept: scripts allow us to execute instructions when a game runs.
Comments
Comments are notes written inside code that are ignored by the engine.
They are useful for documenting scripts and explaining how code works.
Comments begin with the # symbol.
For example:
# Display a message when the game starts
print("Hello Godot!")
Good comments can make scripts easier to understand, especially when returning to a project after a long period of time.
The Importance of Scripting
While scenes, nodes, and assets provide the structure and appearance of a game, scripts provide the behaviour.
Without scripts, game objects would simply sit on the screen and do nothing.
As we progress through this book, GDScript will allow us to create movement systems, enemy behaviours, scoring systems, collisions, animations, and much more.
Fortunately, learning GDScript is easier than many people expect. The language contains a small number of core concepts that can be combined to create surprisingly complex games.
One of the most important of these concepts is the variable. Variables allow us to store and manipulate information while a game is running. In the next section, we will explore variables and data types and learn how games keep track of information such as scores, lives, positions, and player statistics.
Variables and Data Types
In the previous section, we introduced GDScript and created our first script. Now it is time to explore one of the most important concepts in programming: variables.
Variables allow us to store information that can be used and modified while a game is running. They are essential for tracking values such as player health, score, position, speed, lives, and many other gameplay elements.
What Is a Variable?
A variable is a named storage location that holds a value.
You can think of a variable as a labelled container. The label identifies the container, while the value stored inside can change over time.
For example, a game might use variables to store:
The player’s score
The number of remaining lives
The player’s movement speed
The current level
The amount of ammunition available
Without variables, it would be impossible to keep track of information while a game is running.
Creating a Variable
In GDScript, variables are created using the var keyword.
For example:
var score = 0This creates a variable called score and assigns it an initial value of zero.
Similarly, we could create a variable to store the player’s speed:
var speed = 200Once a variable has been created, its value can be used and modified throughout the script.
Modifying Variables
Variables are useful because their values can change during gameplay.
For example:
var score = 0score = score + 10
After this statement executes, the value of score becomes 10.
This technique is commonly used when a player collects an item or defeats an enemy.
Common Data Types
The type of value stored inside a variable is known as its data type.
GDScript supports several data types, but a few are used frequently in game development.
Integers
Integers represent whole numbers.
Examples include:
var lives = 3
var score = 100
var level = 1
Integers are often used for scores, lives, timers, and counters.
Floating-Point Numbers
Floating-point numbers, often called floats, represent decimal values.
Examples include:
var speed = 150.5
var gravity = 9.8
Floats are useful when working with movement, physics, and calculations that require precision.
Strings
Strings store text.
Examples include:
var player_name = "Patrick"
var message = "Game Over"
Strings are commonly used for user interface elements, dialogue, and messages.
Booleans
A Boolean variable can have only two values:
truefalse
For example:
var game_over = false
var player_alive = true
Booleans are useful for tracking states and conditions within a game.
Vectors
Godot provides a special data type called Vector2 for storing two-dimensional positions and directions.
For example:
var position = Vector2(100, 200)The first value represents the X coordinate, while the second represents the Y coordinate.
Vector2 variables are used extensively in 2D game development for movement and positioning.
Using Variables in Games
Variables appear throughout virtually every game project.
For example:
A platformer might use variables for:
Player speed
Jump strength
Remaining lives
A shooter might use variables for:
Ammunition count
Score
Number of enemies destroyed
A Pacman-style game might use variables for:
Dots collected
Remaining lives
Current level
As games become more complex, variables become increasingly important for managing game state and player progression.
Choosing Meaningful Variable Names
When creating variables, it is important to use descriptive names.
Good examples include:
var player_score
var player_speed
var enemy_health
Poor examples include:
var a
var x
var value
Descriptive names make scripts easier to read, understand, and maintain.
Why Variables Matter
Variables form the foundation of almost every programming task. They allow games to store information, react to player actions, and keep track of what is happening during gameplay.
As you build the games in this book, you will create variables to manage scores, lives, movement speeds, timers, enemy behaviour, and many other systems.
Now that we understand how to store and manage data using variables, we can begin using that data to make decisions. In the next section, we will explore functions and conditional statements, allowing our scripts to perform actions and respond to different situations.
Variable Types in GDScript
In GDScript, it is not always necessary to explicitly specify the type of a variable. When a variable is assigned a value, Godot can often determine the type automatically. For example, in the following code, Godot recognises that the values are integers:
var lives = 3
var score = 100
var level = 1
However, you can also specify the type explicitly if you wish:
var lives: int = 3
var score: int = 100
var level: int = 1
Adding the type can make your code easier to read and understand, especially in larger projects. It can also help Godot detect certain programming errors before the game is run. Throughout this book, we will often use the shorter form when the type is obvious, but both approaches are valid and commonly used in Godot projects.
Functions and Conditions
In the previous section, we learned how variables allow us to store information such as scores, lives, and player statistics. However, storing data is only part of programming. We also need a way to perform actions and make decisions based on that data. This is where functions and conditional statements become useful.
Functions allow us to organize code into reusable blocks, while conditions allow our games to make decisions and react to different situations.
What Is a Function?
A function is a block of code that performs a specific task.
Instead of writing the same code multiple times, we can place it inside a function and call it whenever it is needed.
Functions help make scripts:
Easier to read
Easier to maintain
Easier to reuse
A simple function looks like this:
func say_hello():
    print("Hello!")
When this function is called, the message is displayed in the Output panel.
Calling a Function
Creating a function does not automatically execute it.
To run a function, we must call it:
func say_hello():
    print("Hello!")
    func _ready():
        say_hello()
When the game starts, the _ready() function calls say_hello(), causing the message to be displayed.
Why Use Functions?
Functions allow us to organize our code into logical sections.
For example, a player script might contain functions such as:
move_player()
jump()
take_damage()
increase_score()
By separating tasks into individual functions, scripts become easier to understand and modify.
As our games become larger, functions will become increasingly important for keeping code organized.
Functions with Parameters
Functions can also receive information through parameters.
For example:
func display_score(score):
    print(score)
The value passed into the function is stored inside the parameter and can be used within the function.
Calling the function might look like this:
display_score(100)This would display the value 100 in the Output window.
Parameters allow functions to become more flexible and reusable.
What Is a Condition?
Conditions allow programs to make decisions.
A condition evaluates whether something is true or false.
For example:
var lives = 3
if lives > 0:
    print("Player is alive")
Because the value of lives is greater than zero, the message is displayed.
Conditions are one of the most important tools in programming because they allow games to react to changing situations.
Comparison Operators
Conditions often use comparison operators.
Some common operators include:
For example:
if score >= 100:
    print("Level Complete")
This condition checks whether the player’s score has reached at least 100 points.
Operators include:
== : Equal to
!= : Not equal to
> : Greater than
< : Less than
>= : Greater than or equal to
<= : Less than or equal to
Using Else
Sometimes we want to execute different code depending on the result of a condition.
This can be achieved using the else keyword.
For example:
if lives > 0:
    print("Continue Playing")
else:
    print("Game Over")
If the player has lives remaining, the first message is displayed. Otherwise, the second message is displayed.
Using Else If
When multiple conditions must be checked, we can use elif.
For example:
if score >= 100:
    print("Gold Medal")
elif score >= 50:
    print("Silver Medal")
else:
    print("Bronze Medal")
The program checks each condition in sequence and executes the first one that evaluates to true.
Combining Conditions
Multiple conditions can be combined using logical operators.
The most common are:
andornot
For example:
if lives | 0 and score >= 100:
    print("Level Complete")
This condition is only true if both requirements are satisfied.
Combining conditions allows us to create more sophisticated gameplay rules.
Functions and Conditions in Games
Functions and conditions appear throughout game development.
For example:
A platformer might use conditions to:
Check if the player is on the ground before jumping
Detect whether the player has reached the exit
Determine if the player has lost all lives
A shooter might use conditions to:
Spawn a new wave of enemies
Check if the player has ammunition remaining
Trigger a game over screen
A Pacman-style game might use conditions to:
Detect when all dots have been collected
Determine whether a ghost can be eaten
Check if the player has won the level
Functions and conditions work together to create the logic that drives a game.
Why Functions and Conditions Matter
Functions help us organize and reuse code, while conditions allow our games to make decisions and react intelligently to player actions.
Together, they form the foundation of most gameplay systems.
As we begin building complete games later in this book, you will use functions and conditions constantly to implement movement, collisions, scoring systems, enemies, lives, and level progression.
Now that we know how to store information and make decisions, we are ready to interact with the player directly. In the next section, we will learn how to handle player input and respond to keyboard actions such as moving, jumping, and shooting.
Handling Player Input
In the previous section, we learned how functions and conditions allow our games to perform actions and make decisions. However, a game would not be very interesting if the player could not interact with it. To create interactive experiences, we must be able to respond to keyboard, mouse, or controller input.
In this section, we will learn how Godot handles player input and how we can use it to control game objects.
What Is Player Input?
Player input refers to any action performed by the player while the game is running.
Common examples include:
Pressing a keyboard key
Clicking the mouse
Moving a joystick
Pressing a controller button
Games constantly monitor player input and respond accordingly.
For example:
Pressing the left arrow key might move a character left.
Pressing the space bar might make a character jump.
Clicking the mouse might fire a projectile.
Without input handling, players would have no way to interact with the game world.
Input Actions
One of Godot’s strengths is its input action system.
Instead of checking specific keys directly, Godot allows us to define named actions.
For example:
ui_leftui_rightui_upui_downui_accept
This approach makes scripts easier to read and allows controls to be changed without modifying code.
The Input Map
Input actions are managed through the Input Map.
To access it:
Open the Project menu.
Select Project Settings.
Click the Input Map tab.
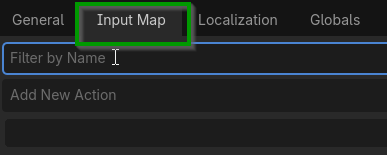
Here you can view existing actions or create your own.
For example, you might create actions called:
move_leftmove_rightjumpshoot
Each action can be linked to one or more keyboard keys, mouse buttons, or controller buttons.
This flexibility makes it easy to support different control schemes.
Detecting Key Presses
Godot provides several functions for detecting player input.
One commonly used function is:
Input.is_action_pressed()This function returns true while a key is being held down.
For example:
if Input.is_action_pressed("ui_right"):
    print("Moving Right")
As long as the right arrow key is held, the condition remains true.
Detecting Single Key Presses
Sometimes we only want to detect the moment a key is pressed.
For example, a jump should usually occur once when the player presses the key, not continuously while the key is held.
For this purpose, Godot provides:
Input.is_action_just_pressed()For example:
if Input.is_action_just_pressed("ui_accept"):
    print("Jump")
This condition becomes true only during the frame in which the key is first pressed.
Detecting Key Releases
Godot can also detect when a key is released.
This is achieved using:
Input.is_action_just_released()For example:
if Input.is_action_just_released("ui_right"):
    print("Stopped Moving")
This can be useful for handling charging mechanics or triggering actions when a button is released.
Moving a Game Object
Player input is often used to move objects.
For example:
func _process(delta):
    if Input.is_action_pressed("ui_right"):
position.x += 200 * delta
This code moves the object to the right while the right arrow key is held.
The value delta represents the time elapsed since the previous frame and helps ensure smooth movement regardless of frame rate.
Common Input Actions
Godot automatically includes several useful actions:
ui_leftui_rightui_upui_downui_acceptui_cancel
These default actions make it easy to create simple prototypes quickly.
As projects become more advanced, you will often create custom actions tailored to your game’s requirements.
Input in the Games We Will Build
Throughout this book, player input will play a central role.
In our Space Shooter, we will use input to:
Move the spaceship
Fire projectiles
In our Breakout game, we will use input to:
Move the paddle
In our Pacman-style game, we will use input to:
Navigate the maze
In our Platformer, we will use input to:
Move the character
Jump between platforms
The same input concepts will be reused throughout each project.
Testing Input
A useful technique when learning is to display messages whenever input is detected.
For example:
func _process(delta):
    if Input.is_action_just_pressed("ui_accept"):
        print("Action Detected")
Running simple tests like this helps confirm that actions have been configured correctly before implementing more complex gameplay mechanics.
Why Input Handling Matters
Input handling forms the connection between the player and the game.
By responding to keyboard, mouse, and controller actions, games become interactive and engaging. Nearly every gameplay system relies on some form of input, making it one of the most important topics in game development.
Now that we can respond to player actions, it is time to explore another powerful feature of Godot: signals. In the next section, we will learn how signals allow different objects to communicate with one another and respond to events automatically.
Working with Signals
In the previous section, we learned how to handle player input and respond to keyboard actions. While input allows players to interact with the game, many events occur automatically during gameplay. For example, a button may be clicked, a timer may expire, or two objects may collide. Godot provides a powerful mechanism called signals to handle these events.
Signals allow nodes to communicate with one another without being tightly coupled. They form one of the core features of Godot and are used extensively throughout game development.
What Is a Signal?
A signal is a message emitted by a node when a specific event occurs. Other nodes can listen for that signal and execute code when the event happens. You can think of signals as notifications.
For example:
A button emits a signal when it is clicked.
A timer emits a signal when it reaches zero.
An Area2D emits a signal when another object enters its collision area.
An animation emits a signal when it finishes playing.
Signals allow us to react to events without constantly checking whether they have occurred.
Why Use Signals?
Without signals, scripts would need to continuously monitor objects and conditions.
Signals provide a cleaner and more efficient approach.
They help to:
Reduce code complexity
Improve project organization
Allow nodes to communicate easily
Make scripts more reusable
As projects become larger, signals become increasingly valuable.
Common Signals
Many Godot nodes include built-in signals.
Some commonly used examples are:
Button: pressed
Timer: timeout
Area2D: area_entered
AnimatedSprite2D: animation_finished
These built-in signals cover many common gameplay situations.
Connecting a Signal
Let’s examine a simple example.
Create a Button node and select it in the Scene Tree.
Open the Signals tab located beside the Inspector.
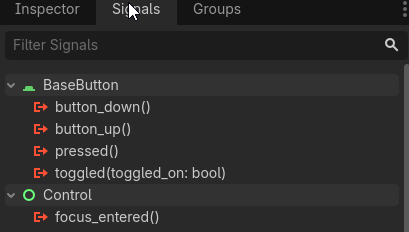
A list of available signals will appear.
Double-click the pressed signal.
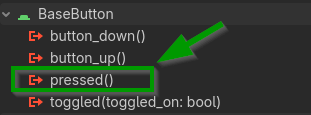
Godot will display a dialog allowing you to connect the signal to a script.
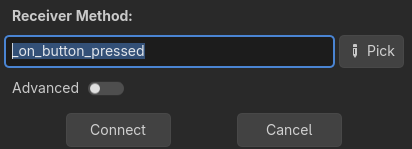
Accept the default settings and click Connect.
Godot automatically creates a function similar to:
func _on_button_pressed():
    pass
This function will be called automatically whenever the button is clicked.
Responding to a Signal
Once the signal has been connected, we can add code to the generated function.
For example:
func _on_button_pressed():
    print("Button Clicked")
Now, whenever the button is pressed, the message will appear in the Output panel. This simple example demonstrates how signals allow events to trigger actions automatically.
Signals and Timers
Signals are frequently used with timers.
Suppose we create a Timer node and connect its timeout signal.
Godot generates a function similar to:
func _on_timer_timeout():
    print("Time's Up")
Whenever the timer reaches zero, the function is executed automatically.
This technique is commonly used for:
Enemy spawning
Power-up durations
Countdown systems
Delayed actions
Signals and Collision Detection
Signals are also useful for detecting collisions. For example, an Area2D node can emit the area_entered signal when another Area2D enters its collision area. The connected function might look like:
func _on_area_entered(area):
    print("Collision Detected")
This approach is commonly used for:
Collecting coins
Picking up power-ups
Triggering checkpoints
Opening doors
Detecting enemy hits
Many of the games in this book will use signals to handle collisions and interactions.
Custom Signals
In addition to built-in signals, developers can create their own custom signals.
For example:
signal player_diedThis creates a new signal called player_died.
The signal can then be emitted whenever appropriate:
player_died.emit()
Other nodes can connect to the signal and react accordingly.
Custom signals are especially useful in larger projects where many systems need to communicate.
Signals in the Games We Will Build
Signals will appear throughout the projects in this book.
For example:
In the Space Shooter, signals can be used to:
Detect bullet impacts
Handle button clicks on the Game Over screen
In the Breakout game, signals can be used to:
Detect brick destruction
Restart the game
In the Pacman-style game, signals can be used to:
Detect collected dots
Handle ghost collisions
In the Platformer, signals can be used to:
Detect collectibles
Trigger checkpoints
Activate level transitions
Learning how signals work will make many gameplay systems easier to implement.
Why Signals Matter
Signals are one of Godot’s most powerful features because they allow nodes to communicate efficiently and respond automatically to events.
Rather than constantly checking whether something has happened, we can simply connect a signal and let Godot notify us when the event occurs.
As you continue working with Godot, you will discover that signals play an important role in creating clean, organized, and maintainable code.
You have now been introduced to many of the fundamental concepts required to begin building games with Godot, including scenes, nodes, assets, scripting, variables, functions, conditions, player input, and signals. In the next section, we will summarize what we have learned and prepare to start building our first complete game.
Summary
This chapter introduced the fundamental concepts that form the foundation of game development in Godot. You learned how Godot projects are organised using scenes and nodes, how assets can be imported and displayed, and how GDScript can be used to add behaviour and interactivity to game objects.
You also explored several important programming concepts, including variables, data types, functions, conditional statements, player input, and signals. These concepts allow games to store information, make decisions, respond to player actions, and react to events occurring within the game world. Together, they provide the essential tools needed to create interactive and engaging gameplay experiences.
In addition, you became familiar with the Godot editor and learned how to create projects, build scenes, organise resources, and attach scripts to nodes. These skills will serve as the foundation for every game developed throughout the remainder of this book.
With these fundamentals in place, you are now ready to begin creating complete games. In the next chapter, you will apply the concepts learned in this chapter to build a Space Shooter game. Along the way, you will learn how to create player movement, fire projectiles, spawn enemies, detect collisions, manage scores and lives, and implement many of the gameplay systems commonly found in arcade games.