In this chapter, we will start using Visual Scripting, a built-in feature available in Unity that lets you create game logic using visual nodes instead of traditional code. We’ll use Visual Scripting to build gameplay logic where the player collects items across multiple levels — from a maze to an island, and finally to a village.
After completing this chapter, you should be able to:
You will build the logic gradually and visually — starting with something simple, like incrementing a value, and progressing to a complete system where the player picks up boxes, advances through levels, and sees a Win message at the end.
Imagine you’re assembling IKEA furniture. The manual shows you pictures of each part and how they fit together — you don’t need to read paragraphs of instructions. Visual Scripting in Unity works the same way. Instead of typing code, you connect visual nodes that represent actions, conditions, and logic.
With Visual Scripting, you can:
All without writing traditional C# code!
Let’s say you’re building a maze game and want to allow the player to collect items. With code, you’d need to know how to write OnTriggerEnter, how to compare tags, and how to use variables. But with Visual Scripting, you drag out blocks like puzzle pieces: “When this happens → do that.”
Visual Scripting is:
Whether you’re a beginner or a coder looking to speed up development, it’s a great tool to add to your kit.
Getting Started: Installing Visual Scripting in Unity
By default, Visual scripting should already be installed, and you can check that it is by looking at the Project window, and checking if you can see a folder called Visual Scripting in the folder Packages, as per the next figure:

However, if the folder is not present, you will need to install Visual Script; in that case, follow the next steps.

Overview of the Visual Scripting Graph Window
Once the Visual Scripting package has been installed, it’s time to open the graph editor — your visual playground for building logic.
- The Visual Scripting Graph Editor will then open in a new window or tab, as per the next figure.

- The Graph window is where all the action happens.

- Center (Canvas): This is where you drag and connect nodes — like building blocks.
How Visual Scripting Executes Logic
At the core of Visual Scripting are Events and Flows.
For example:
Each node has ports:
You click and drag from one port to another to connect nodes, just like connecting dots.
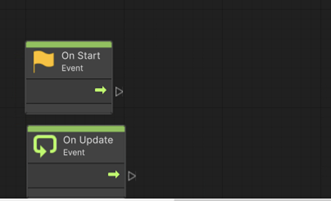
For example, the next figure shows a simple graph that logs “Hello World!” to the console when the game starts.

To work efficiently with the nodes of your visual scripts:
Now that you’ve installed Visual Scripting and opened your first graph, you’re ready to build logic without code.
In the next part of this chapter, we will:
Soon after, we’ll build the logic to collect boxes, update the score, and move through the levels all the way to the Win scene.
Before we jump into collecting objects or loading levels, let’s take a moment to understand the core ideas behind Visual Scripting. These are the building blocks — like the grammar of a new language or the tools in your backpack before a hike.
We’ll explore:
Understanding these concepts will make your visual scripting smoother and way more fun.
Variables: Your Game’s Memory Bank
Think of a variable like a labelled jar on a shelf. You can store something in it (like a score), check what’s inside, or change it whenever you need. In Visual Scripting, you use variables to:
In Unity, Visual Scripting offers a few kinds of variables such as float, integer, string, Boolean or even vectors.

Some of these variables can be local to a single graph (graph variables), stored on a specific GameObject (GameObject variables), available across all objects in the scene (scene variable), global across all scenes (application variable) or even stored after quitting (saved variable).

Variables are usually available from the Script Graph Panel (to the left of the screen).
Let’s create a simple counter variable:


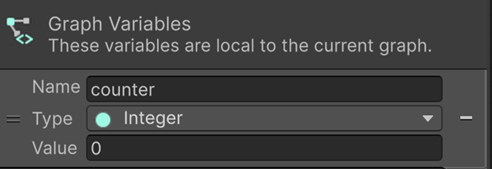
Congratulations! You now have a just created a variable your game can update, display, and check later.
Events: The Triggers That Start Everything
Think of events like someone ringing your doorbell. You didn’t know when it would happen, but once it does, it triggers a response — you go to the door.
In your game, events include:
These event nodes are usually the starting point of your logic flows.
Let’s create a new event:

.

You can now connect nodes from this event to make things happen.
Nodes and Flows: The Language of Logic
Nodes are the heart of Visual Scripting — each one is a tiny machine that does one thing:
Every node has ports:
Imagine a train track system:
Let’s link a few nodes now to see how this works:


You can now play the scene, and you should see the message “Hello World” in the Console window, as per the next figure.
Conditions and Branches: Making Decisions
Sometimes your game needs to choose — “Has the player collected 4 boxes?” or “Did they press a certain key?”
In that case, you can use the If node to make yes/no decisions.
It’s like a fork in the road: if something is true, go left; if false, go right.
Try a Simple Condition


Saving Data Across Scenes with Saved Variables
So, your player collects boxes in the Maze, and then… the level changes — but what happens to the score?
This is where Saved Variables come in. It’s Unity’s way of storing data like a sticky note between scenes or game sessions.
You’ll use it to:
Storing and Retrieving Between Scenes
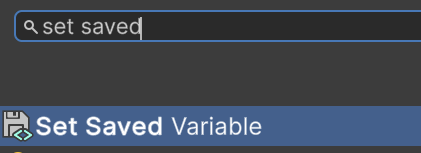
Let’s create a saved variable:


So, in the previous steps, and while these two new nodes are not yet connected to an event, we set the variable score to 3, and this variable can be read later, regardless of the scene that is currently loaded; this is because Saved Variables persist across scenes during the session.
Now that you’ve installed Visual Scripting and learned the basics of variables, events, and nodes, let’s get hands-on and build your first working script. We’ll start small — by creating a counter that goes up every time the player presses a key. This is like building your first LEGO model: simple, satisfying, and the beginning of bigger things. This script will help you understand how variables, input events, and flow work together. Once you’re comfortable with this, you’ll be able to expand into more complex logic like item collection and scoring.
What Are We Building?
Let’s say you want the game to count how many times the player presses the spacebar. Each press increases a number shown on the screen. This could represent:
We’ll use:
Create a Graph to Handle Logic
Now let’s create the logic that increases the value of the counter.
First, we will create an Empty GameObject for the logic:

Next, we will Create a Variable for the Counter


Detecting the Keyboard
Next, we will detect when the player presses the space bar:

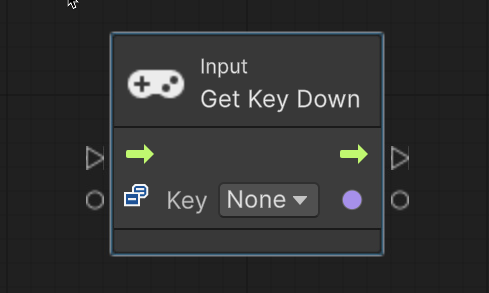

This node is now set-up, and it will be triggered each time the spacebar is pressed.
Increasing the counter
In this section, we’ll increase the counter by 1 every time the space bar is pressed. For this, we will create and combine several nodes to create an integer (1), get the value of the variable counter, and set the counter variable with its previous value + 1.


Once this is done, it is time to combine these nodes.

Finally, we need to add one to the variable counter so drag the B input from the node Add Inputs, select Integer Literal, and set it to 1.

So, based on the entire graph, whenever the player presses the space key, the variable counter will be increased by 1.
However, so that the keys can be detected we need to make sure that the counter is increased only when we have pressed the Space key:
Connect the OnUpdate node to the GetKeyDown node, this ensures that the game listens to the keyboard.

Next, we need to modify the connection between the nodes Get Key Down and Set Variable; at present, the variable is set, regardless of whether the space key has been pressed; instead, we should check that it is true that the space key has been pressed before setting the variable counter.

In the previous figure, we use an If node between the nodes Get Key Down and Set Variable. This conditional statement is based on the value of the output of the node Get Key Down; if it is true, then we proceed (flow) to the node Set Variable.
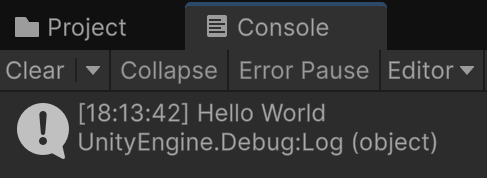
Finally, to be able to print the value of the score, we could just add a Debug Log node to display the value of the counter in the console window:

In the previous graph, we just added a Debug Log node, for which the message is the value of the variable counter.
You can now play the scene, and press space bar (after selecting the Game window, so that the space bar is detected), and you should see corresponding messages in the Console window.

Summary
In this chapter, we have learned how to use Get Key Down to respond to player input, allowing us to trigger actions when specific keys are pressed. We also explored how to create and update variables, which store and track information during gameplay. By using basic math nodes such as Add, we were able to manipulate numerical values—an essential skill for implementing game mechanics. Additionally, we discovered how to modify UI elements in real-time, giving immediate feedback to the player based on their actions.
This simple logic forms the foundation for more advanced game features such as collecting items, implementing scoring systems, managing health bars, and tracking inventory. Mastering these basics enables you to build more interactive and responsive game experiences
As you create your first visual scripts, you will probably need to undo or remove elements or connections, the following should be helpful:
Let’s quickly review the key concepts we’ve learned:
Quiz
It is now time to test your knowledge. Please state whether the following questions are TRUE or FALSE; the solutions are on the next page.